Export video to file
You can export video from the Senstar Symphony Client as .aira or .avi files.
The Senstar Symphony Clientsaves the video files to the location that you specify. You can also select to include the Senstar Symphony Player with the export and set the maximum size for video files.

-
In the Senstar Symphony Client interface, perform one of the following tasks:
- Right-click the view panel and click Export to export video from the camera that is active in the view panel or Export All to export video from all of the cameras that are active in view panels.
- Hover over the view panel and click the Export icon.
- Right-click the timeline to mark the export start and export end, and click Export to export video from the camera that is active in the view panel or Export All to export video from all of the cameras that are active in view panels.
-
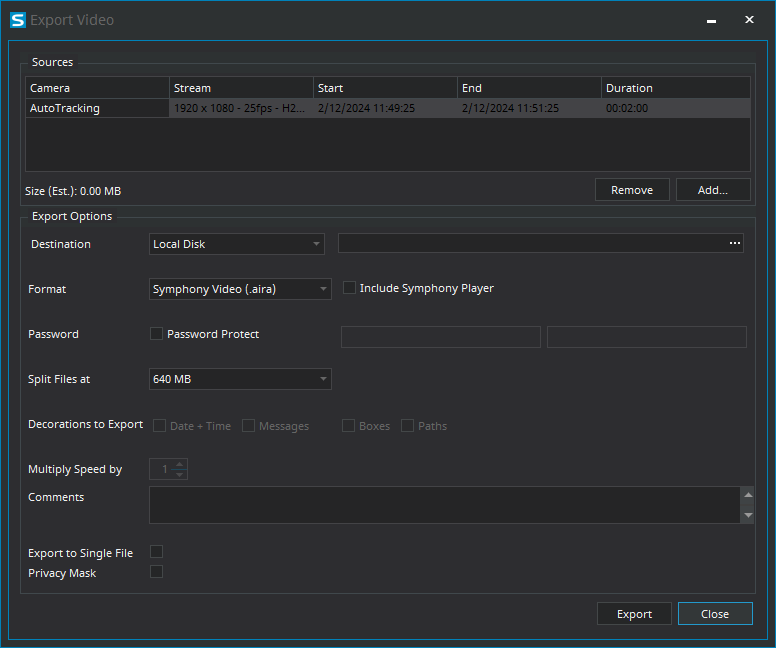
To add a camera stream to the export, perform the following tasks:
- Click Add.
- Select the camera and click Add.
- In the sources list, select the stream in the Stream column.
- If required, modify the start and end time for the export.
- In the Destination list, select Local Disk and specify the file location for the exported video.
- In the Format field, select the file format to use for the video export.
-
To include the Senstar Symphony Player with the video export, select
Include Symphony Player.
You can use the Senstar Symphony Player to play .aira files.
-
To protect the video export files with a password, perform the following tasks:
- Select Password Protect.
- Type and confirm the password.
-
In the Split Files at field, select the maximum size (in MBs) for the video export files.
The Senstar Symphony Client divides the exported video into files no larger than the size that you specify.
- If you export video as an .avi, select the decorations to include in the video export.
- If you export video as a summary video (.avi), select the speed at which to multiply the video playback.
- In the Comments field, type any text that you want to include in the text file that is associated with the video export.
-
To add a privacy mask to video export, perform the following tasks:
- Select Privacy Mask.
- In the Privacy Mask pane, draw the privacy mask on the sample image.
- Click Export.
