The VE150 is a good choice for indoor and outdoor motion tracking applications. The engine can classify the difference between people and vehicles, and can detect if the object is stopping, starting, or simply moving through the scene. Alarm rules can therefore be designed around these features.
Typical deployments include:
• Commercial buildings, where people or vehicles are to be detected,
• Military bases, where objects entering an alarm zone or crossing a pre-defined perimeter should be detected, or
• Car dealers and construction sites, where full time security guards are not a cost effective approach to detecting people or vehicles after hours.
The VE150 will produce far fewer false alarms caused by a changing outdoor environment as compared to normal motion detection algorithms. Different VE150 modes of operation are available, which can be used for indoor people counting and dwell time applications.
Task 1: Configure VE150
To configure the VE150:
1. In Symphony Client, from the Server menu, select Configuration. The Configuration dialog box opens. This allows you to configure devices for the currently selected server.
2. In the left pane, click Devices. The Devices dialog box opens.
3. Click the camera you want to configure for use with video analytics and click Edit.
4. Click the Analytics Engines tab and select VE150. By default VE250 is selected, in which case you must first deselect VE250.
5. Click the Analytics Configuration tab.
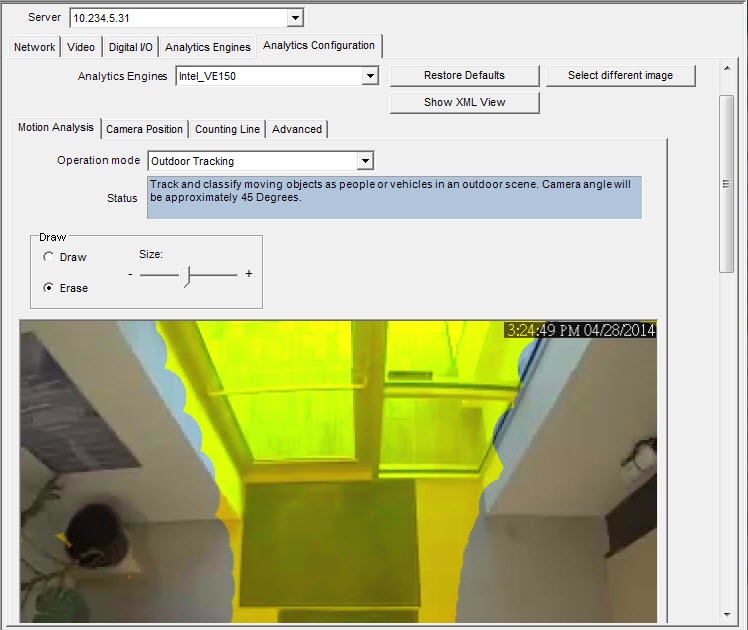
1. From the Analytics Engines drop-down list, select Intel_VE150.
2. Click the Motion Analysis subtab. A current image from the video is displayed.
Motion Analysis subtab
1. From the Operation Mode drop-down list, select a mode. The Status field displays a description of the operation mode selected.
• Outdoor Tracking
• Non-Overhead People Tracking
• Overhead People Tracking
• Overhead People Counting
• Wrong Direction Detection
• Simple Blob Tracker
2. You will define an area in the image for motion detection. If the image is not adequate, click Select different image. The Select Image dialog box opens. Select an image from the Timeline.
3. Using the displayed image from the video, define the area in yellow (a mask) where objects in motion should be detected. (Not sure of the concept? See Masks.)
• Select the Erase option to erase the yellow mask.
• Select the Draw option to draw the yellow mask.
• The Size slider adjusts the pen thickness.
Camera Position subtab
1. Click the Camera Position subtab. Depending on which Operating Mode you selected in the Motion Analysis subtab, the Camera Position options will vary.
Operation Modes: Outdoor Tracking, Non-Overhead People Tracking, and Wrong Direction Detection |
Specify the camera's position relative to objects in the captured image:
Alter the three lines such that the reference people sizes appear accurately throughout the scene. (To review the concept, see Perspective.) • Resize lines by dragging the line end points. • Move the line by dragging it at the center. • Lines represent distance along the ground. • Length value given only to understand how each line relates to the other lines (foreground versus an expanse in the distance). Therefore units of measurement are irrelevant. • To move a reference person, left-click at feet location of person icon and drag. • To add a reference person, right-click at the desired location in the image. • To delete a reference person, left-click on person icon and press Delete. 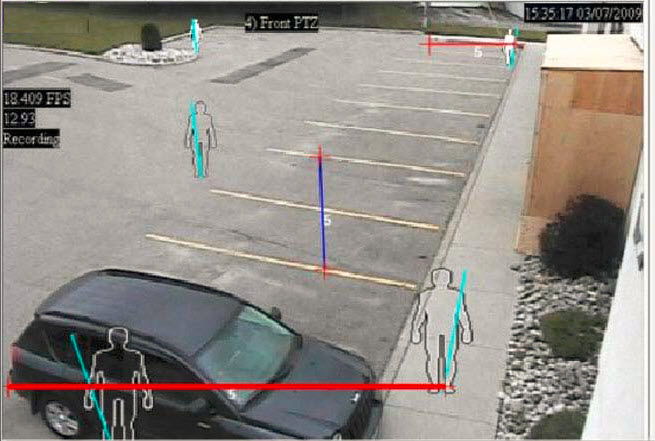
|
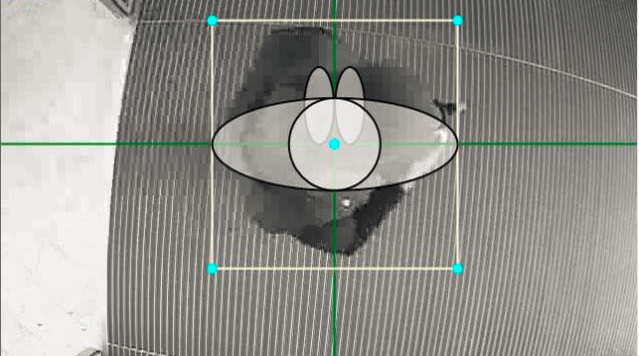
Operation Mode: Overhead People Tracking |
Specify the camera's position relative to objects in the captured image:
• You can configure all objects highlighted in cyan. • Move the middle cyan point of the center box to a location directly below the camera. • Using the corner points, adjust the center box to the size of an average person. • Adjust the outer boxes’ cyan lines such that the boxes represent the size of an average person. • If the camera is placed very high and pointed directly down at the floor, make all three boxes the same size. 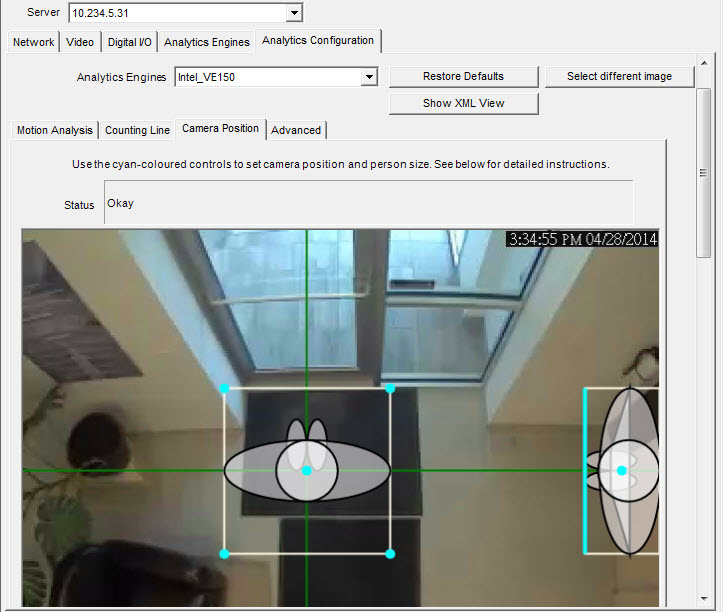
|
Operation Mode: Overhead People Counting |
Specify the camera's position relative to objects in the captured image:
• You can configure all objects highlighted in cyan. • Move the middle cyan point of the center box to a location directly below the camera. • Using the corner points, adjust the center box to the size of an average person. 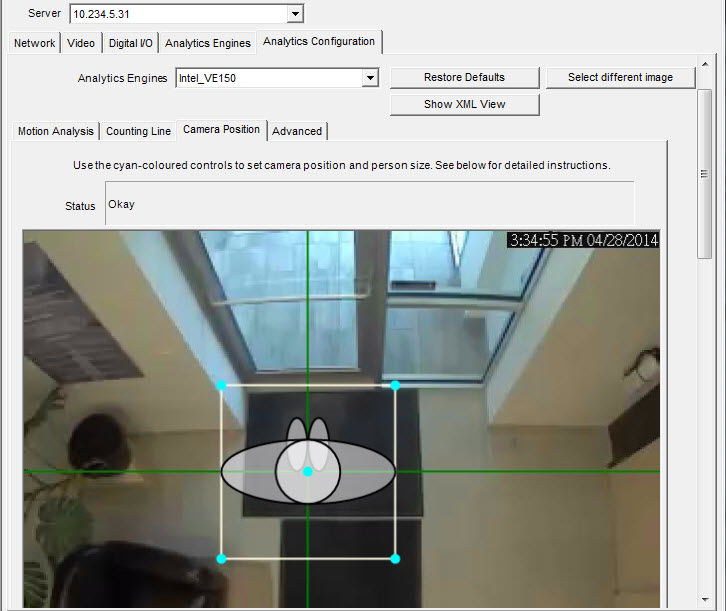
|
2. Click Apply to save settings.
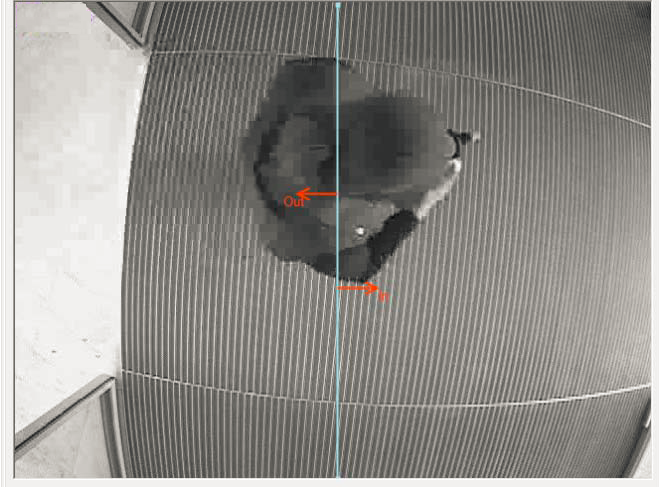
1. Ensure the Camera Position and Motion Analysis mask is set properly and then click the Counting Line subtab.
2. By default, the Draw Counting Line option is selected.
3. Left-click on the image and draw a line that will cause items (people or cars) to be counted as they pass the delineated area.
• The line appears with arrows indicating when movement is detected as In to a delineated area and Out of the delineated area.
4. Click OK to save settings or click the Advanced subtab for further settings.
The Advanced subtab settings are for experts only. Values should be changed only in cases where the analytic engine is not functioning as expected. |
1. Enter a frame per second value in the Analysis FPS field.
• This value indicates how many frames will be analyzed by the system. Typically the default value should not be altered. However, there may be cases where the analysis frame rate can be reduced to conserve CPU. Doing this may negatively alter the algorithms performance.
• Like the Analysis Resolution, the Analysis FPS can be set to a different value than the Record FPS.
2. Set the Analysis Resolution as required.
• Setting the Analysis Resolution the same as the Capture Resolution ensures that objects will be detected as far away as possible. However, in order to conserve CPU resources it is possible to down sample the video sent for analysis. Downsampling will reduce CPU requirements but may also reduce the detection range of the video analytic.
3. From the Background Model drop-down list, select the model that best represents the environment the camera is recording (for example, a high movement area).
Adjusting the Background Model is usually the best way to reduce false alarms. (It requires more CPU.) |
Background Model |
When to use |
Static |
Use where the background is relatively static (no periodic movement in the background such as swaying trees). This is the fastest Symphony background model. |
Dynamic |
Use where there are periodic moving objects (like a tree branch moving back and forth in a fairly constant wind, or caused by unstable camera mounting). This background model can handle both static and dynamic backgrounds, but it uses more CPU power than the Static model and thus is not recommended for static backgrounds.
Important: An environment might appear static during the day, but rain fall at night will create a dynamic environment. Therefore, you should select the Dynamic setting. |
Dual Layer Dynamic |
Similar to the Dynamic background model but is capable of tracking objects that are stationary for short periods of time. Use in outdoor areas where you want to track, for example, people standing still for 30 to 60 seconds. |
Spatio- Temporal |
Tracks only consistent motion, so it is capable of greatly reducing the false alarms due to tree branches and other objects in the background that can move randomly due to the wind. This will use more CPU and will reduce the detection range of the video analytics. |
4. Various options and default settings are displayed based on the Operation Mode and Background Model selected. Before selecting options, learn about their usage:
Option |
Description |
Default Setting |
Learn normal behavior |
Learns the percentage of time each pixel is in motion and can subsequently ignore. Useful, for example, when tracking boats on water. |
False |
Options |
||
Appearance |
Manual, Bright shiny, Grey matted |
Manual |
Lower bound |
If Manual selected |
0.70 |
Upper bound |
If Manual selected |
1.50 |
Mode |
Coherent Motion, Abnormal Behavior, Wrong Direction |
Coherent Motion |
Appearance Marginalization |
Only detects motion patterns and is not influenced by the appearances. |
True |
Threshold |
Detection threshold for Spatio-Temporal pattern. |
0.03 |
Bg Frames |
If Abnormal Behavior selected |
255 |
Fg. Frames |
If Abnormal Behavior selected |
10 |
Direction |
If Wrong Direction selected. Read-only. |
242 |
Foreground contrast |
Sets the minimum contrast needed for an object to be detected as a foreground object. Important: If set to a large value, then objects with similar color as background will not be detected as valid objects to track. |
Low |
Reset background condition |
If this percentage of the frame changes, the background is reset. |
100 |
Foreground contrast for determining camera obstructed |
Sets the minimum contrast needed between background and foreground before the change is considered for a camera-obstructed scenario. |
Low |
Background learning duration (seconds) |
Determines the approximate length of time it will take a foreground object that becomes stationary to merge into the background. Important: If an object has a periodic movement with a period greater than the specified time, then that object will always be considered a foreground object (never merged into the background). The background is determined based on the last Update Background Seconds of video. The background is updated all the time, not only when the analytics engine starts. |
15 |
Wait after large background change and before starting to track objects (seconds) |
Allows you to set how long to wait after background reset and before starting to track objects. Ideally it should be zero, but if the you are aware of a lighting issue where starting to track immediately can cause false alarms, then set this to the number of seconds needed for the light to stabilize. |
0 |
High contrast threshold |
The threshold used to determine how far apart an observation can be from the learnt background model before it is detected as foreground. A low value (for example, 5) will make the background model more sensitive to small changes in the pixel intensities.
Note: The value can mean different things for different background models. |
25 |
Remove ghost pixels |
Any pixels that do not change in value for some time are not considered as foreground. |
True |
Track Slow Moving Objects / Object Speed |
Tracks an object moving very slowly across the video. It can also be an object coming directly toward or directly away from the camera, which will appear to be moving slowly.
If Track Slow Moving Objects is disabled these objects tend to become part of the background and as such will not be tracked. By enabling this option these objects will be tracked.
Important: This option might increase some false alarms for situations where an object stands still in the video for a long time. |
False |
Shadow Sensitivity |
Controls how aggressively shadows (decreases in lighting) are ignored when tracking moving objects. Increasing the slider (to the right) will allow the engine to correctly ignore more of the shadow areas.
Note: This will also increase the potential of a person wearing dark clothing on light background to be classified as a shadow. |
Middle (disabled) |
Illumination Sensitivity |
Controls how aggressively increases in lighting are ignored. Increases in lighting occur due to a light source such as car headlight or when an overcast day becomes a sunny day. Increasing the slider (to the right) will allow the engine to correctly ignore any increases in illumination.
Note: This will also increase the potential of a person wearing light clothing on a dark background to be classified as an illumination increase. |
Middle (disabled) |
Cloud Check |
Tries to ignore cloud motion. |
False |
Check for sudden background movement |
Tries to remove false tracks due to sudden movement of objects in the background due to wind. It will also eliminate false tracks due to sudden movements of the camera. |
False |
Maximum distance in pixels |
If Check for sudden background movement selected. A sudden movement is defined as a movement of an object or camera up to this many pixels. |
5 (disabled) |
Time to clear long-term background (seconds) |
Only available for Codebook (Dual-Dynamic) background model. |
False (disabled) |
Time to clear short-term background (seconds) |
Only available for Codebook (Dual-Dynamic) background model. |
False (disabled) |
Time to move short-term background to long-term (seconds) |
Only available for Codebook (Dual-Dynamic) background model. |
False (disabled) |
Initial background model learn time (seconds) |
Only available for Codebook (Dual-Dynamic) background model. |
False (disabled) |
Classification |
||
Automatic classification |
Attempts to automatically classify objects such as cars, people or unknown. Includes colour coding as well. |
True |
Force all tracked objects to be classified as Vehicles |
All tracked objects are classified as vehicles. |
False |
For all tracked objects to be classified as People |
All tracked objects are classified as people. |
False |
Force all tracked objects to be classified as Unknown |
All tracked objects are classified as unknown. |
False |
Find Objects |
||
Use contour-based segmentation |
Better segmentation of moving objects using the contour. |
True |
People-only segmentation |
If Use contour-based segmentation selected. Will try to keep nearby people as individually tracked objects. There is a potential that large vehicles might appear as multiple smaller objects. |
False |
Merge objects closer than (meters) |
Any detected objects that are within the specified distance of each other will be merged into one object |
2.5 |
Smallest object size (pixels) |
Objects with width smaller than Smallest object size will be ignored by the engine. |
2 |
Don’t track objects larger than (% of screen) |
If a detected object has a width or height greater than the specified percentage of image width or a height respectively, it is ignored. |
90 |
Line People Counting |
||
Consider only contiguous segments |
When performing line counting, looks for continuous segments. Does not try to accumulate all pixels for each direction. |
False (disabled) |
Min Object Width Ratio |
The ratio of the object width considered as the minimum person width (0.33 by default). For example, if the object width is 9 pixels and less than 3 pixels are counted in one direction when crossing the line, it will be not counted as an object. |
0.33 (disabled) |
Max Object Width Ratio |
The ratio of the object width considered as the maximum person width (1.88 by default). This is considered only when Multiple counting support in width is enabled. If more pixels are counted, a new person will be considered. For example, if the object width is 9 pixels and more than 9*1.88=16.92 pixels are counted in one direction when crossing the line, two people will be counted. |
1.85 (disabled) |
Multiple counting support in width (side-by-side) |
Considers cases where there can be more than one person at the same time crossing the line side-by-side. |
True (disabled) |
Object Line Crossing Duration (seconds) |
The time it takes for a person to cross the line. |
1.00 (disabled) |
Min Object Length Ratio |
The ratio of time (with respect to object line crossing duration) that is required to detect an object. For example, assuming 10 FPS analysis rate, it is required that enough motion is detected in at least 2 consecutive frames in order to count a person (as well as in at least 3 pixels width). |
0.30 (disabled) |
Max Object Length Ratio |
The ratio of time (with respect to object line crossing duration) that is required to consider that a new object is coming behind without any gap. A default ratio of 3 is considered in order for people walking with strollers/shopping carts not to be counted twice. If the environment does not allow for this, lower the ratio, for example to 2.2. |
3.00 (disabled) |
Multiple counting support in length |
Considers cases where there can be more than one person crossing the line back-to-back without creating a gap. |
True (disabled) |
Track Objects |
||
Make all objects foreground |
All detected objects will become foreground objects and be displayed. |
False |
Don’t merge overlapping tracks |
When the tracks of two objects meet they will not be merged into one object. |
True |
Foreground sensitivity |
Adjusts how sensitive the engine is to tracking objects and can be used to reduce false tracks from trees blowing in the wind, or increase the likelihood of tracking a poorly visible object (such as people partially obstructed by vehicles in a parking lot). |
Middle |
Specify the minimum distance an object must travel to become a tracked object |
Attempt to detect only tracks of a certain length. |
False |
Minimum travel (meters) |
|
1.0 |
Reduce false tracks from snow |
Try to remove tracks created by snow. |
True |
Track small objects |
Objects less than 5/16 meters will not be deleted as snow. |
False |
Task 2: Create a Rule using VE150
To configure a Rule using the VE150:
1. You must configure the VE150 before creating a Rule that uses the VE150.
2. From the Server menu, select Configuration and then Rules
3. Click New. The Rule Wizard opens. Read the overview and click Next.
4. Select the check box next to the camera name. If it is a PTZ camera, select the camera tour position check box.
5. From the Select video engine for those running on camera drop-down list, select VE150.
6. For a Digital fence assuming Outdoor Tracking mode was selected:
a. Click the Any Fence or Delete Fence to draw and erase the digital fences. The arrows define which direction the offending object must pass through the line(s) in order to cause an alarm.
b. Double-click the arrows to change their properties.
• Red indicates an object crossing the line in this direction will cause an alarm.
• The green arrow denotes the object crossing the line in this direction would not cause an alarm.
• Multiple fence lines can be drawn.
If All fences has been selected, the object must cross through all fences drawn to cause the alarm. |
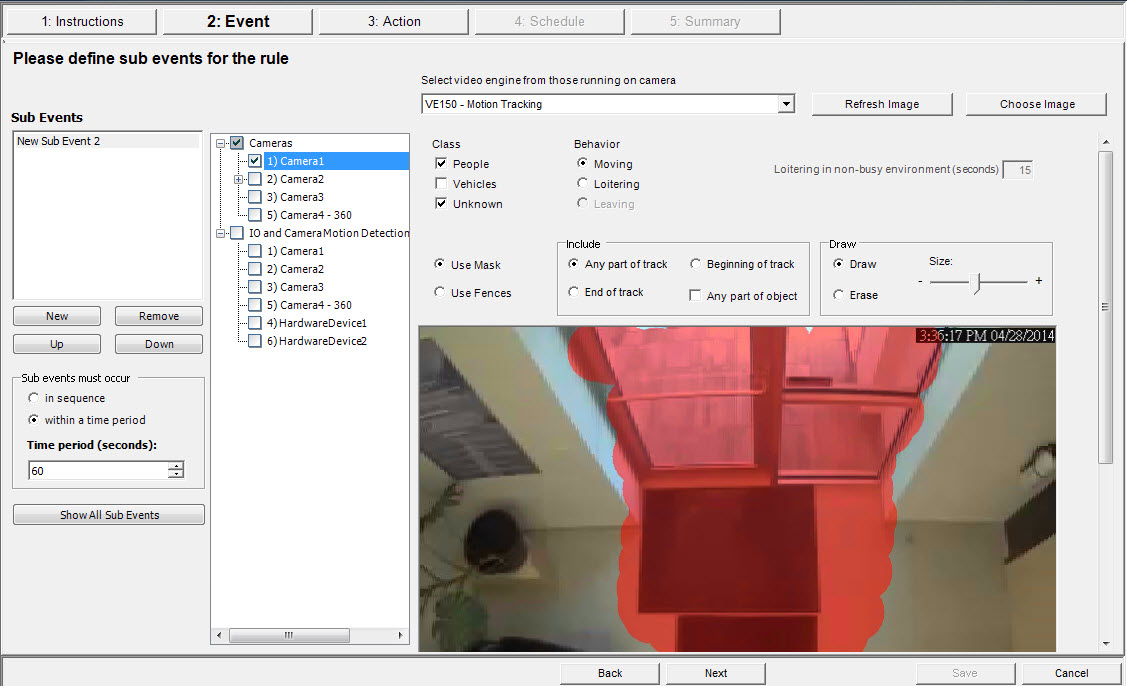
7. For Alarm zone, mark the Alarm zone:
• Select the Erase option to erase the red mask.
• Select the Draw option to draw the red mask.
• The Size slider adjusts the pen thickness.
8. The following settings apply only to alarm zones:
• Any part of track denotes the object can be anywhere in the red alarm zone to trigger an alarm. To alarm on vehicles moving anywhere in the alarm zone, select Any part of track.
• End of track denotes that the object has stopped in the alarm zone. To alarm on vehicles entering the alarm zone and stopping in it, select End of track.
• Beginning of track denotes that the object started moving in the alarm zone. To alarm on vehicles that were parked in the alarm zone and started to move, select Beginning of track.
9. Select the Class check boxes to filter or detect specific classes of objects.
10. Click Next to continue to next step in wizard.
• Ensure the correct frame rate is being used, and that enough CPU is available on the system to perform proper analysis.
• Verify that perspective has been properly set by adjusting the Camera Position tab.
• If nuisance false alarms occur by trees or reflections, try the Dynamic background model (Environment tab). If problems still persist, contact Aimetis for support.