For network cameras or video servers, you can:
• Add a network camera
• Configure advanced features, for example, recording schedule
• Configure analytics engines
To add a new network camera or video server:
1. From the Server menu, select Configuration. The Configuration dialog box appears with Devices displayed in the right pane.
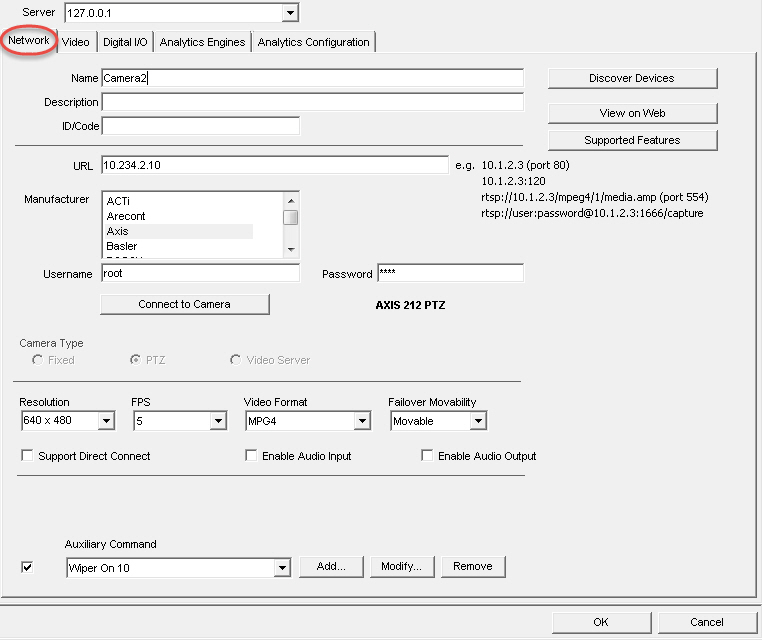
2. In the right pane, click New. The Network tab appears.
Field/button |
Description |
Discover Device |
Opens the Discover Device dialog box displaying a device tree. Expand the brand name to see a list of devices. |
View on Web Browser |
Opens a Web browser to the camera URL (IP address). |
Supported Features |
Opens the Web browser to the Aimetis Xnet list of supported devices. |
Server |
The name of the server managing cameras. |
Name |
Enter an appropriate and easily identifiable name for the camera. |
Description |
Enter an easily identifiable description. For example, “Camera near front door.” |
ID/Code |
Enter the code or identification you are using to classify and easily identify your cameras. |
URL |
IP address of the device |
Manufacturer |
Identify a camera in your system by selecting it by brand name. |
Username |
Enter a username to access the camera. This may be pre-established based on your company protocol. |
Password |
Enter a password to access the camera. This may be pre-established based on your company protocol. |
Connect to Camera |
The Symphony server connects with the camera and automatically detects the Resolution, FPS, and Video Format. |
Camera Type |
Select one of the options: Fixed, PTZ, or Video Server |
Fixed |
Fixed camera type. |
PTZ |
A Pan-Tilt-Zoom type camera. |
Video Server |
For a device that uses COAX input (from an analog camera), has a compressor, and network port as output. |
Resolution |
Various resolutions, for example, 160x120, 176x144, 240x180, 320x240, 480x360, 640x480 |
Frames Per Second
Example Scenario: • On-camera FPS = 5 • User selects a video analytic with a default FPS (or chooses an FPS) that is different from the on-camera setting, for example FPS = 8 Results: • If camera synchronizes with Symphony settings, then FPS=8 will be used for streaming from cameras, decompression, video analysis, writing to disk, live video, historical recording, and searches. • If Video Format = MJPG • FPS=8 will be used for streaming from camera, decompression, and video analytics. • FPS=5 will be used for writing to disk, live video, historical recording, and searches. • If camera does NOT synchronize with Symphony settings, then the on-camera FPS dictates, regardless of the setting in Symphony. As such, in our example, FPS=5 will be used for streaming from cameras, decompression, video analysis, writing to disk, live video, historical recording, and searches. |
|
Video Format |
Various formats based on camera type: MJPG, H264, H264 Unicast, H264 Multicast, H264 Over TCP, H264 Over HTTP, H264 over HTTPS |
Failover Movability |
If set to Movable, then this device can move to another server in the farm during failover. If set to Unmovable, then the device cannot be moved. Any device that requires access to resources available only on a single server (for example, COM port, special SDK or drivers) is unmovable. All others are typically movable. |
Enable audio streaming |
Depending on camera, allows live audio. |
Depending on camera, allows direct connection to camera versus via server when View>Settings>Video tab, Direct connect to camera check box also selected. |
|
Enable Audio Input |
Depending on camera design, allows user to speak through the camera. |
Enable Audio Output |
Depending on camera design, streams live audio from the camera. |
Depending on camera design, allows user to define and manage additional supported device commands. See |
Task 1: Name a new network camera:
1. In the Name field, enter an appropriate and easily identifiable name for the camera.
2. In the Description field, enter an easily identifiable description. For example, “Camera near front door.”
3. (Optional) In the ID/Code field, enter the code or identification you are using to classify and easily identify your cameras.
Task 2: Locate the camera on the network
1. Enter an IP address in the URL field or click Discover Devices to locate devices (the IP address) on the network. The Discover Devices dialog box opens displaying a device tree.
2. Expand the brand name to see a list of devices.
3. Right-click on a device and select Connect to Symphony. The IP address of the device is now displayed in the URL field.
4. Enter a Username and Password for the device. (This may be automatically displayed.)
Task 3: Automatically or Manually determine the device specifications:
Automatically:
1. Click Connect to Camera. The Camera Type and values for Resolution, FPS and Video Format are automatically detected and displayed.
Manually:
1. From the Manufacturer list, select the brand or manufacturer of the camera.
2. Select the Camera Type, and set the Resolution, FPS and Video Format appropriately.
Task 4: Specify Failover Movability
1. From the Failover Movability drop-down list, specify whether the device will automatically move to a redundant server under a failover condition.
• If set to Movable, then this device can move to another server in the farm during failover.
• If set to Unmovable, then the device cannot be moved. Any device that requires access to resources available only on a single server (for example, COM port, special SDK or drivers) is unmovable. All others are typically movable.
Video Tab - Configure Advanced Features
To configure advanced features:
1. Click the Video tab. From the Record Video and Record Audio lists, select a condition or schedule when Symphony should record video and audio on a specific camera. The options are available only if Symphony has detected that a recording feature is supported by your camera.
2. By default, video is recorded 15 seconds before and after an event. You can adjust this amount by entering a value in seconds in the Pre Event and Post Event fields.
3. The Change Frame Rate On Alarm option is available only if Symphony has detected this feature is supported by your camera.
Option |
Available for |
Symphony records video... |
Always |
All video cameras |
For this specific camera |
Schedule |
All video cameras |
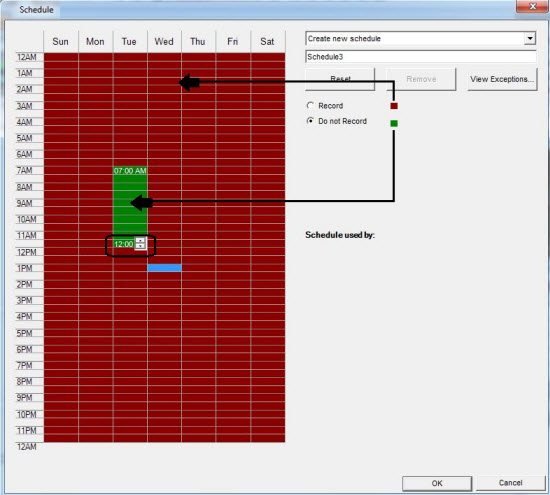
On the schedule you specify. 1. Click Set Schedule. The Schedule dialog box opens. 2. By default, the Do not record option is selected. Using your mouse, click on the date and time intervals you do NOT want video recorded (green) and click OK. 3. You can set recording schedules to per minute ranges. Click on at least two squares in one column. Hover your mouse over the first square or the last square in the column (earliest or latest hour interval). Arrow range buttons appear. Click the arrows to change times to per minute ranges.
|
Schedule and Motion Detected by PC |
When motion detection video engine also selected |
On motion but only during the time period you specify. |
Tracked Motion Detected by PC |
When motion detection video engine also selected |
If objects are tracked through the scene (for example, a person or vehicle moving through the scene is tracked as motion, but moving tree branches should not be tracked and therefore video would not be recorded) |
Schedule and Pixel Changes Detected by PC |
When motion detection video engine also selected |
Symphony records video whenever pixel changes are detected as objects are tracked through the scene, but only during the time period specified. |
Pixel Changes Detected by PC |
When motion detection video engine also selected |
Whenever pixel changes are detected. Note: A tree moving in a heavy wind could cause pixel changes and therefore cause Symphony to record video |
Motion Detected by Camera |
Cameras which support Motion Detection |
Using motion detection capabilities inside the network camera itself, and not using a video analytic engine from Symphony (quality of motion detection similar to Pixel Changes) |
Schedule & Motion Detected by Camera |
Cameras which support Motion Detection |
Records if motion detected during a specific time interval as defined by user. Using motion detection capabilities inside the network camera itself, and not using a video analytic engine from Symphony |
Never |
All video cameras |
Never records video unless specified to be recorded in a Rule |
Option |
Symphony records audio... |
Never |
Never records audio unless specified to be recorded in a Rule |
Same as video |
Records audio based on the video record settings |
Rule Broken |
Records audio only when an alarm is triggered |
4. To add another video stream for the current network device, click Add a new Stream.
• If the
network device allows additional network video streams, the streams
can be added from the same physical device. Useful when one video
is defined for recording and another for live video.
The video recording options available are the same as defined by the
default stream. Video resolution can also be defined independently for
the additional stream(s).
5. To rotate the picture, select a value from the Rotate Degrees field.
6. If you are using a PTZ camera, select a value in the Maximum Locked Minutes field to specify how long a PTZ camera should remain in its current position before it returns to its preset (Home Position).
7. Only for 360-degree camera lenses. To de-warp 360-degree video, select the Enable panoramic technology check box. From the drop-down lists, select the camera brand and a Position (wall, ceiling, ground) for how the camera is mounted.
8. Click Apply to save your settings and move onto the Analytics Configuration tab, or click OK to save settings and close the dialog without configuring the selected video analytics engines (default configuration settings will be used).
Task 1: Enable panoramic technology for the Axis camera:
In the Server Configuration dialog box, click the Video tab.
Select the Enable panoramic technology check box.
From the drop-down lists, select the Axis or Eneo camera and a Position (wall, ceiling, ground).
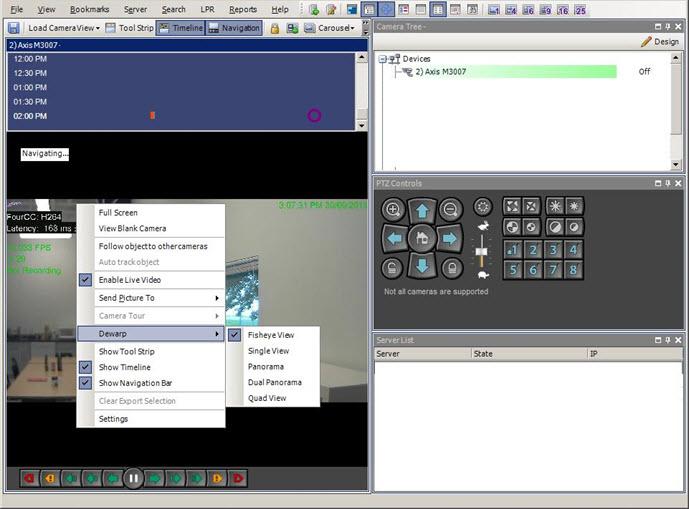
Task 2: Select panoramic modes from the context menu of the panel for the camera:
Right-click on the panel displaying video (live or historical) from the camera.
Select Dewarp. All options are displayed.
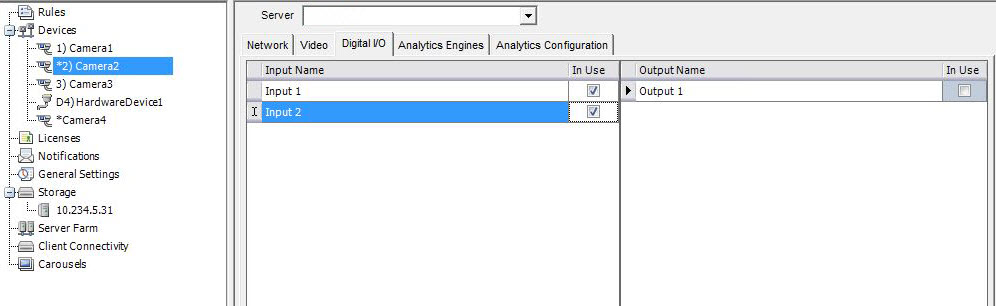
For Axis cameras with digital I/O, the Digital I/O tab appears.
1. Click the Digital I/O tab.
2. (Optional) You can change the input and output names by clicking on each row and typing new text.
3. Select the In Use check boxes for each I/O as necessary.
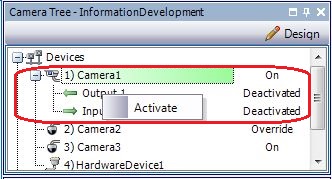
4. Activate (or deactivate) each Output for the Axis camera as necessary in the Camera Tree dialog box.
Rules in Symphony define what Event constitutes an alarm in the real world (for example, a perimeter breach or even suspicious behavior around a car) and what Action to take after an alarm is raised (for example, whether to send a security guard to the location in question).
Alarm inputs include Video Motion Detection from network cameras and external I/O devices. To set up rules for I/O devices, see Rules - Using the Rule Wizard.
By selecting the Analytics Engines tab, individual video analytics engines can be added to each camera. See About Video Analytics.