Aero- Elevator Floor Groups
The following guide provides steps to configure floor groups for elevator control in the Symphony AC Software. Considerations Prior to Setup Please ensure that you have set up the Aero panel inSymphony AC and have set up the controller for elevator control PRIOR to setting up floor groups. For instructions on how to set up the Aero panel in Symphony AC (i.e. add the Aero controller), please visit the following link: http://support.Senstar.com/knowledgebase/Symphony AC-Aero-hardware-setup-guide/ For instructions on how to set up elevator control for the Aero hardware, please visit the following link: http://support.Senstar.com/knowledgebase/elevator-control-setup-3/ You will also need to set up Access Levels PRIOR to setting up floor groups. For instructions on how to set up Access Levels in Symphony AC, please visit the following link: http://support.Senstar.com/knowledgebase/Symphony AC-access-levels-setup-guide/ Setting Up Floor Groups
I. Creating Floor Groups
- Click on the Access Module and select “Access Levels”. Unlock the module and select the appropriate controller group. Click on the “Floor Groups” tab. (See Figure 1)
Figure 1 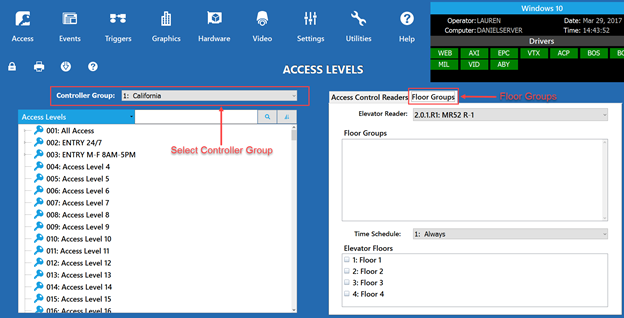
- Under the Floor Groups tab, select the proper elevator reader that is associated with the floors that you wish to place into Floor Groups. (See Figure 2)
Figure 2 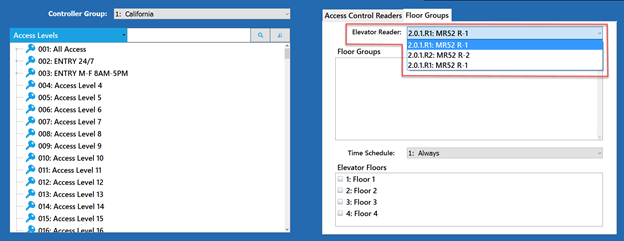
- In the Floor Groups tab, you will see the “Floor Groups” pane. Right-click within the “Floor Groups” pane and select “Add New Floor Group”. (See Figure 3)
Figure 3 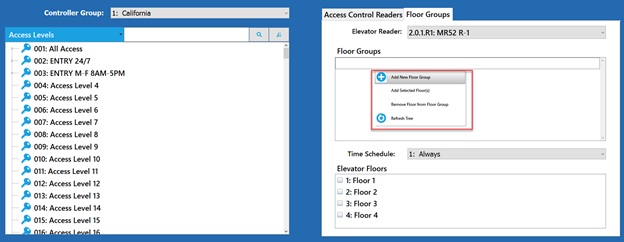
- Select the “New Floor Group”. Right-click on the New Floor Group and and select “Edit Description”. Enter the desired description. (See Figure 4)
Figure 4 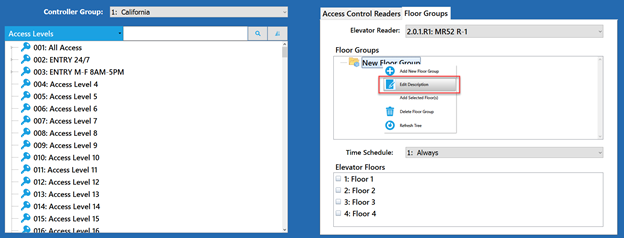
- On the “Elevator Floors” pane, select the floors to be added to the new Floor Group. (See Figure 5)
Figure 5 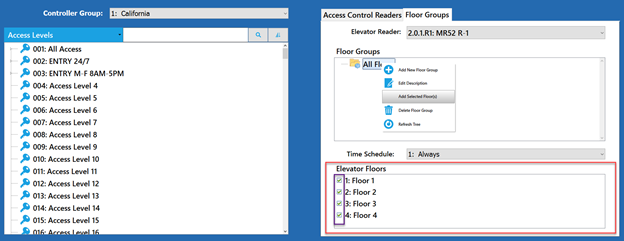
- Click on the field next to “Time Schedule” to access the “Time Schedule” drop-down menu. Select the appropriate Time Schedule to associate to these floors. (See Figure 6)
Figure 6 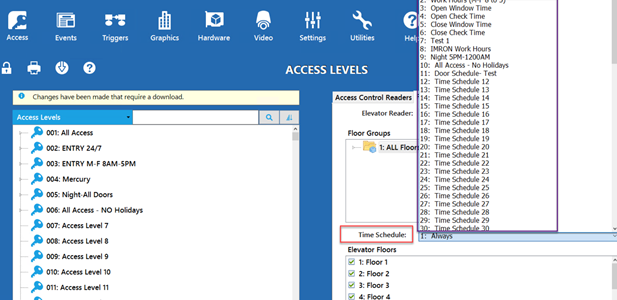
- On the Floor Groups pane, select the newly created floor group. Right-click on the new floor group and select “Add Selected Floors”. In the alternative, you may drag and drop the floors to the new floor group. (See Figure 7)
Figure 7 
8. To configure another Elevator Reader, select the reader from the “Elevator Reader” drop-down menu. (See Figure 8)
Figure 8 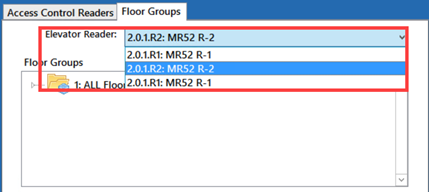
9. In the “Floor Groups” pane, you will see Floor Group “Reader 1 ALL Floors” which was created for Elevator Reader 1. DO NOT EDIT this Floor Group as it will edit floors for Elevator Reader 1. You will need to create a new Floor Group for Elevator Reader 2. To create a new Floor Group for Elevator Reader 2, right-click within the “Floor Groups” pane and select “Add New Floor Group”. (See Figure 9)
Figure 9 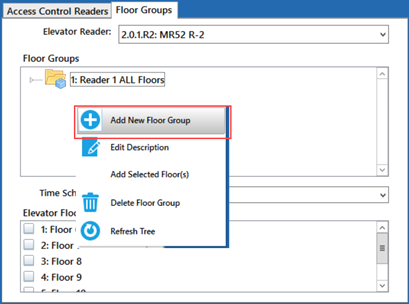
10. Select the “New Floor Group”. Right-click on the New Floor Group and select “Edit Description”. We recommend you include the Reader number in the description to prevent confusion when editing other readers. (See Figure 10)
Figure 10 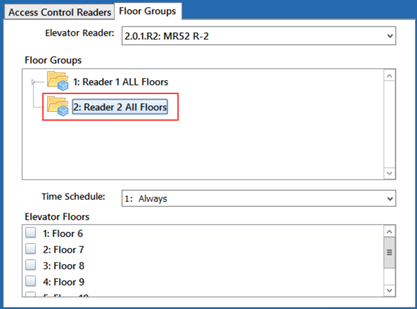
11. Repeat steps 5-7 from this section to add floors to the Floor Group. If you are configuring more Elevator Readers, DO NOT EDIT Floor Groups that are configured for a different reader. For example, if we were to configure a third Elevator Reader, we would NOT EDIT Floor Groups 1 & 2 since they are being used by Readers 1 and Reader 2 respectively.
II. Adding Floor Groups to Access Levels
- Complete the following in the Floor Groups tab: (See Figure 11)
a) Select the Floor Group to be added to the Access Level.
b) Under Access Levels, select and right click on the desired Access Level, and select “Add selected Floor Group to Access Level”. In the alternative, you can drag and drop the Floor Group to the Access Level.
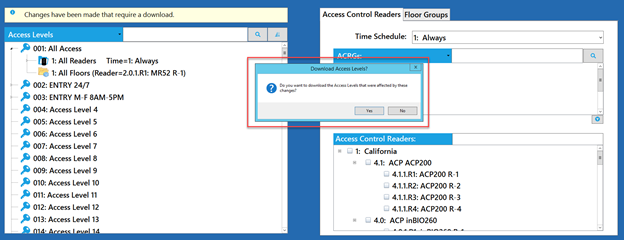
c) After you add a Floor Group to an Access Level, you will receive a notification stating, “Changes have been made that require a download”. You do NOT need to immediately perform a download and may continue to make any necessary changes.
Figure 11 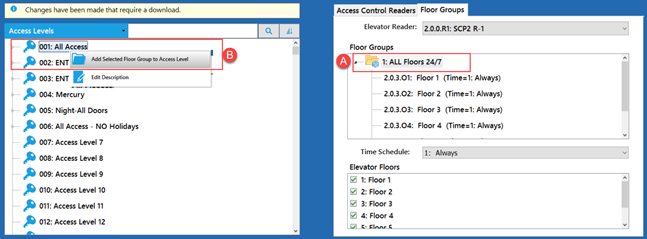
- Once you have finished editing Floor Groups, click on the “Download” button. You will receive the following message: “Do you want to download the Access Levels that were affected by these changes?” (See Figure 12)
Selecting “YES” will download Access Levels to ALL controllers.
To perform a download ONLY to AFFECTED CONTROLLERS, select “NO” and perform a manual download of the Access Levels Database by selecting only the controllers affected by the changes.
Figure 12